All articles

July 7, 2026

By Sam Gao, Founder of Diningprint

Chopstick Sleeve Dieline Templates: Sizes, Bleed & File Specs (Free Reference)

Everything you need to prepare print-ready artwork for custom chopstick sleeves — standard dieline sizes, bleed and safe-zone rules, color and paper options, and what to include when requesting a quote.

  • custom chopstick sleeves
  • dieline template
  • artwork specs
  • custom printing
  • restaurant packaging
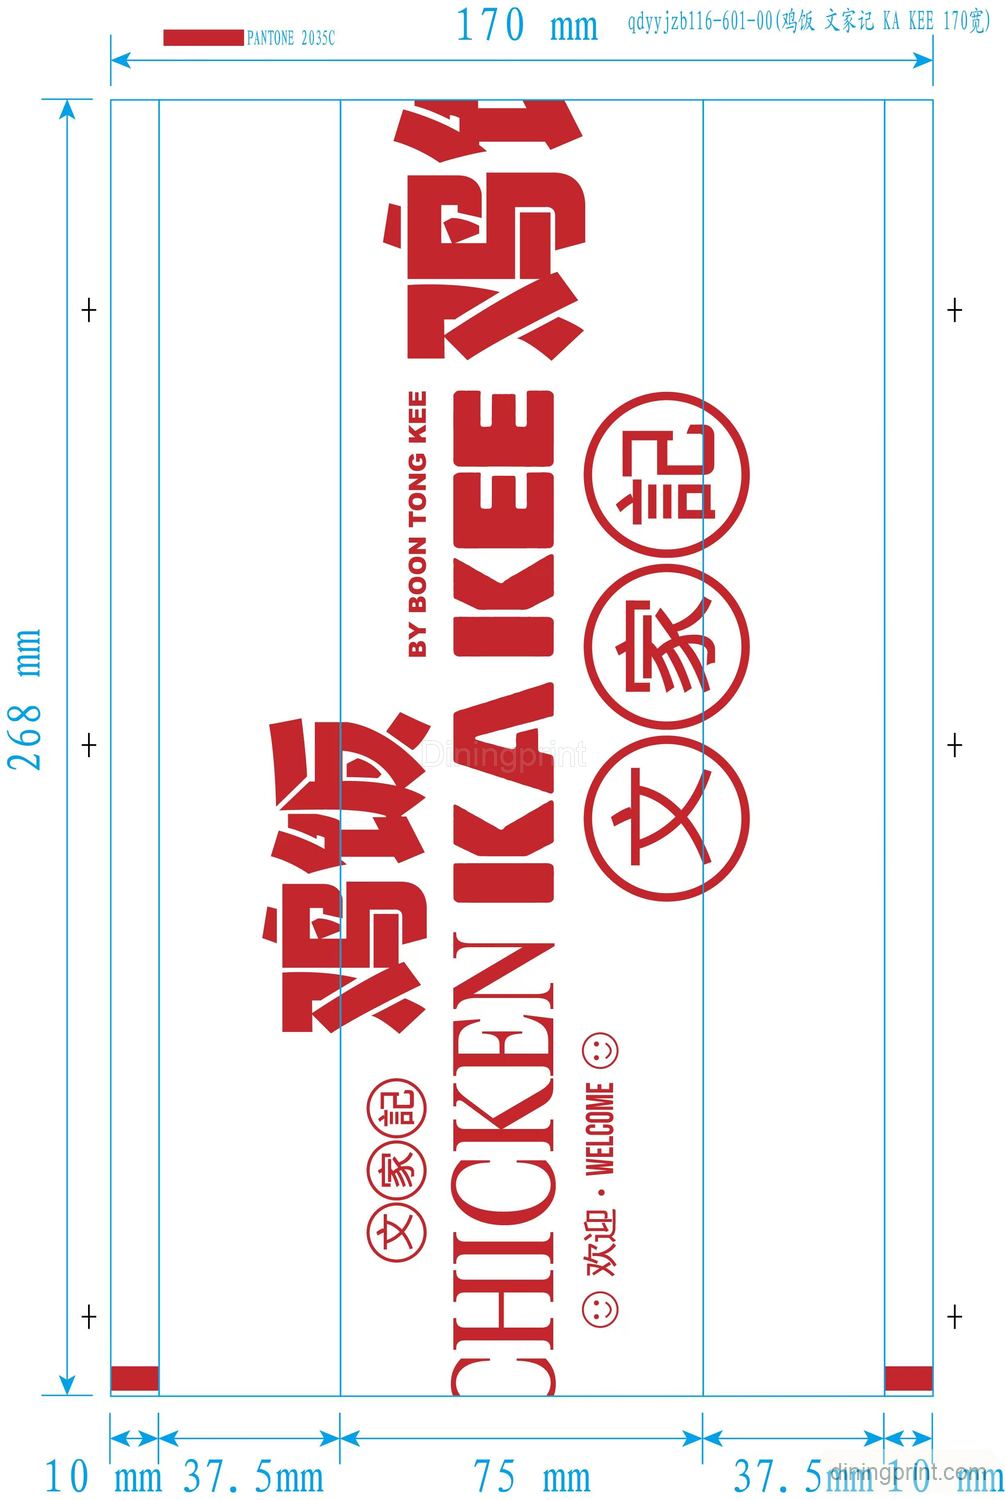
Custom chopstick sleeve printing template with dieline layout for restaurant artwork proofing
A real printing template used to proof a custom chopstick sleeve layout before production.

If you are ordering custom-printed chopstick sleeves for the first time, the fastest way to avoid delays is to get the artwork file right before production starts. This guide covers the standard sleeve dimensions we work with, how bleed and safe zones work on a small-format print like a chopstick sleeve, which color and paper options to specify, and exactly what to include when you request a quote or a pre-production sample.

Use it as a working reference: if your designer has this page open while preparing the file, the dieline proof usually passes on the first round.

What a chopstick sleeve dieline actually is

A dieline is the flat template that defines the exact cut lines, fold lines, glue area, and printable area of the sleeve before it is die-cut and folded. Your logo and design sit inside this template. When we prepare your order, we send back a dieline proof showing your artwork placed on the template - this is what you approve before anything gets printed in volume.

Because a chopstick sleeve is a small-format print, tolerances that would be invisible on a poster are very visible here. A logo placed 2 mm too close to the edge can end up clipped by the die-cut. This is why the bleed and safe-zone rules below matter more than they would on larger packaging.

Standard chopstick sleeve sizes

Sleeve size follows the chopsticks going inside. These are the most common combinations we produce. If your chopsticks are a non-standard length, send us the measurement and we will adjust the dieline - do not force artwork into the nearest standard template.

Chopstick lengthTypical useCommon sleeve styleApprox. flat sleeve size (L x W)
21 cm (8.3")Standard dine-in and takeawayFull open-end sleeve~225 x 29 mm
21 cm (8.3")Casual dining, cost-consciousHalf sleeve (band)~110 x 29 mm
24 cm (9.4")Sushi bars, premium dine-inFull open-end sleeve~255 x 32 mm
24 cm (9.4")Premium presentationClosed-end sleeve~260 x 34 mm

Two notes on reading this table. First, the flat size is the unfolded printable sheet - the finished sleeve looks narrower once folded and glued. Second, a half sleeve (band) uses less paper and prints cheaper per unit, but gives you less branding space; most restaurants choose it when the logo is simple and horizontal.

Bleed, safe zone and fold tolerance

These three rules prevent the most common artwork rejections:

SpecRequirementWhy it matters
Bleed3 mm beyond the cut line on all sidesDie-cutting shifts fractionally between sheets; bleed prevents white edges.
Safe zoneKeep text and logos at least 3 mm inside the cut lineAnything closer risks being clipped or landing on a fold.
Fold linesAvoid placing fine text directly on a fold or glue areaInk on fold lines can crack; glue areas are not reliably printable.

If your background color or pattern is meant to cover the whole sleeve, extend it into the bleed. If your design has a white background, you only need to watch the safe zone.

Color: CMYK or Pantone?

Both work on chopstick sleeves. The right choice depends on what your artwork contains:

  • CMYK (full color / process printing) - best for photographic elements, gradients, or designs with many colors. Expect slight batch-to-batch variation, which is normal for process printing.
  • Pantone (spot color) - best when your brand has one or two exact brand colors that must match your other packaging and signage. A sushi bar with a specific brand red will usually get a more consistent result specifying the Pantone code than approximating it in CMYK.
  • One-color printing - a single Pantone or black-ink design is the most economical option and works well on kraft paper, where a minimal single-color logo often looks more premium than a full-color print.

If you are unsure, send us both your brand color codes and your artwork file - we will flag in the dieline proof if a color choice is likely to disappoint on the chosen paper.

Paper options and how they change the design

The paper you choose affects how your colors reproduce, so decide paper before finalizing artwork:

  • White offset paper - the default for accurate color reproduction. Colors print close to how they appear on screen when the file is set up in CMYK.
  • Kraft (brown) paper - popular for natural and eco-positioned brands. The brown base shifts all printed colors darker and warmer; white ink is not standard, so designs relying on white elements need adjusting. Single dark-color logos look best here.
  • Greaseproof-lined options - relevant if the sleeve doubles as a hygiene wrap in high-humidity or oily-food settings. Tell us the use case and we will confirm the right stock.

How MOQ logic works for printed sleeves

Minimum order quantities exist because of plate setup and die-cutting setup: preparing a print run has a fixed cost regardless of volume, so very small runs are disproportionately expensive per unit. Practical implications for buyers:

  • Unit price drops meaningfully at volume tiers, because setup cost spreads across more units.
  • Reordering the same design later is cheaper and faster than the first run - the dieline, plates and approved sample already exist as your order-specific file set.
  • If you operate multiple locations with the same branding, consolidating into one larger run almost always beats separate small orders.

Exact MOQ depends on sleeve style, paper, and color count, so we quote it per project rather than publishing a single number that would be wrong for half the cases. Send your specs and quantity range and we will come back with the tiers that apply to your job.

The pre-production sample step

Before bulk printing, you approve two things in sequence:

  1. Digital dieline proof - your artwork placed on the exact dieline, showing cut lines, folds, bleed and safe zone. This catches layout problems.
  2. Physical pre-production sample - a printed, die-cut, folded sleeve you can hold, check color against your brand materials, and slide actual chopsticks into. This catches everything a screen cannot: paper feel, color on the real stock, fold alignment.

Bulk production only starts after your approval. If a revision is needed at either step, it happens before volume printing - which is exactly where you want revisions to happen.

What to send for a quote

You do not need a finished print-ready file to get a quote started. This checklist is what makes a quote fast and accurate:

  • Artwork file - vector preferred (AI, EPS, or PDF with outlined fonts). High-resolution PNG works for initial review; we will tell you if the final file needs upgrading.
  • Chopstick length - 21 cm and 24 cm are standard; measure if unsure.
  • Sleeve style - full sleeve, half sleeve/band, or closed-end.
  • Paper preference - white or kraft, or tell us the brand positioning and we will recommend.
  • Colors - Pantone codes if you have them, or your brand hex codes.
  • Quantity range - even a rough range (e.g. 10k-50k) lets us quote the right tiers.
  • Timeline - target delivery date, so we can confirm whether standard production and shipping fit.

Missing something from this list? Send what you have. An incomplete inquiry with a real logo file moves faster than a perfect brief with no artwork.

Get your dieline checked before you commit

Send us your artwork - even a rough draft - and we will place it on the correct dieline and return a proof, so you can see exactly how your sleeve will print before spending anything on bulk production.

Request a free dieline check or start configuring your order.

Frequently asked questions

Quick answers from buyers like you

What file format should I send for custom chopstick sleeve printing?

Vector files (AI, EPS, or PDF with fonts outlined) are preferred because they scale cleanly on small-format prints. A high-resolution PNG is fine for the initial quote and dieline review — we will let you know if the final production file needs to be upgraded.

What is the standard chopstick sleeve size?

It depends on the chopsticks inside. For 21 cm chopsticks, a full open-end sleeve is roughly 225 x 29 mm flat; for 24 cm chopsticks, roughly 255 x 32 mm. Half sleeves (bands) are shorter and use less paper. If your chopsticks are a non-standard length, we adjust the dieline to fit rather than forcing a standard template.

How much bleed does a chopstick sleeve design need?

3 mm of bleed beyond the cut line on all sides, and keep text and logos at least 3 mm inside the cut line (the safe zone). Avoid placing fine text on fold lines or glue areas.

Should I use CMYK or Pantone for my sleeve design?

Use CMYK for multi-color or photographic designs, and Pantone spot colors when you need an exact brand color to stay consistent across batches and match your other packaging. Single-color Pantone printing is also the most economical option, especially on kraft paper.

Do I get a sample before bulk production?

Yes — two approval steps happen before volume printing: a digital dieline proof showing your artwork on the exact template, then a physical pre-production sample you can inspect for color, paper feel and fit. Bulk production starts only after your approval.

Why is there a minimum order quantity for printed sleeves?

Print plates and die-cutting setup carry a fixed cost per run, so very small runs are disproportionately expensive per unit. MOQ and price tiers depend on sleeve style, paper and color count, which is why we quote per project. Reorders of an approved design are faster and cheaper because your order-specific file set already exists.

Artwork specs

Continue through the custom-printed chopsticks resource hub.

Use the hub to connect dieline sizes, bleed rules, sample approval, print methods, and bulk chopstick branding routes.

Open the printing resource hub

Read next

Keep going on related sourcing topics.

Guide

Custom Chopstick Sleeve Printing: From Dieline to Pre-Production Sample

A sample-first workflow for restaurant buyers ordering custom chopstick sleeves: lock the dieline, approve the proof, test the pre-production sample, then move to bulk production.

Read article

Guide

Custom Printed & Engraved Chopsticks for Restaurants | Bulk Factory Pricing

Choose printed sleeves or engraving for restaurant chopsticks, with real MOQ, sample proofing, bulk pricing, and a factory-direct quote path.

Read article

Guide

9–10 cm Wooden Cutlery: The Hot-Stamp Sweet Spot for Gelato, Boba & Small-Format F&B

Small-format F&B grew 5–7× since 2020 — gelato, boba, frozen yogurt, dessert sushi all need 9–10 cm cutlery. Here's why hot-stamp is the only viable print method at this size and what to spec in the PO.

Read article

For your industry

Custom sushi restaurant supplies for daily service and takeaway.

Start with the items every sushi customer actually touches: bamboo chopsticks, printed chopstick sleeves, napkins, sauce cups, paper bags, and simple takeaway boxes or trays when needed. The tableware does not need to be complicated; the goal is a clean sushi experience with one consistent brand impression.

See guide

For your industry

Biodegradable cutlery kits and custom tableware for event catering.

Custom wooden cutlery kits, branded chopsticks, and printed napkins for event catering, weddings, festivals, stadium foodservice, and corporate dinners. 3-piece wooden kit (fork + spoon + knife + napkin in custom sleeve), MOQ 5,000 (digital) or 20,000 (offset), priced on request. Lead time 25-30 days plus freight.

See guide

For your industry

Custom branded coffee shop packaging and cutlery, factory direct.

Build one coffee shop supply kit around the items customers actually carry: printed cups, cup sleeves, napkins, wooden stirrers, paper bags, and pastry boxes. Start with lower-MOQ sleeves, napkins, or stirrers, then scale to cups and multi-SKU repeat orders once the artwork is proven.

See guide